
Last weekend I did something I haven't done for over 2 years, I rocked up , with some of my wares at my local church for their Spring Craft fayre.

I had packed up cards, mugs, paintings and calendars, and crossed my fingers that people would come

Thankfully they did and my work was so warmly received. A lady made a special effort to talk to me and it was so nice to talk to Rose, about my work, and hear about what she was painting too.
I don't do too many things like this, my energy levels are low and I am busy painting and doing things from home. But it was nice to connect with people again and talk about what I do.
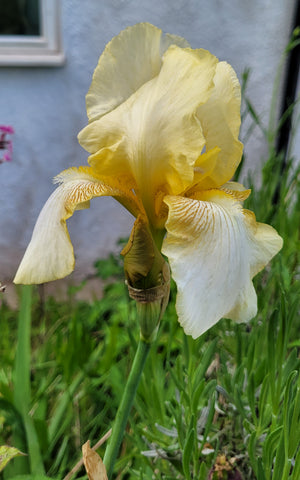
I collapsed back into my studio and decanted the cards into their places. Then I wandered around my garden, and was thrilled to see the irises were out.
, time to think about painting one maybe,

So here goes....
1.

So armed with a reference photo from Pixabay, my paints and water I sketched out the rough outline, and began. The puzzle ,always, with a new subject is figuring out how you can make the paint 'read' as the subject you are painting. I knew i didn't want to be too precise, I also wanted a vibrant finished piece...I swallowed hard and set off.
2.

I began by spraying the paper then dropping in the colour, I wanted this part to be loose, and see if I could get the veins on the flower's petals. I was also looking for lights and darks.
there is a lot going on all at once, and I am feeling my way though , this could all go horribly wrong but be brave, and just put it all down to experience if it doesn't work.
3.

Working quickly, wet in wet, I am adding and taking away, these colours stain so they are difficult to remove, Alizarin Crimson, rose, Cobalt blue, then a drop of yellow. All good fun but sometimes it all seems a bit out of control. I am working things out as I go along seeing what happens and responding it.
4.

Now stepping back as the painting dries , I can see where I want to put in some darker tones, to show where the petal is folded or in shadow.
5
.
Working through the tones step by step, standing back and really looking at what I need to change. It isn't an exact representation of the photo ( at all) but the reference photo helps me to see where the shadows lie. This piece is turning out to be much tighter than I anticipated, which is often the case with a new subject , you need to know a subject well before you can be very wild and free.I thinks it needs something to make it 'pop'
6.

So I decide to add a background. I put my darkest colours next to the lightest parts of the petals to really show the light. I love letting my imagination go a bit wild, and adding colours I just like,
7.
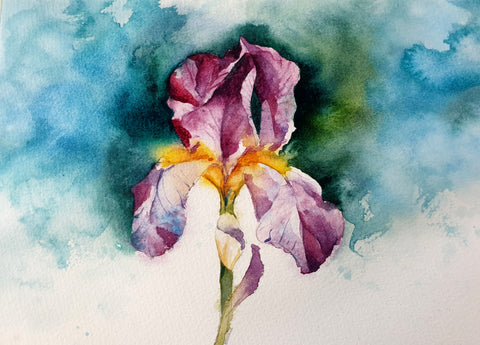
And so my first ever iris is finished, I like the way the yellow runs into the background, I like to let the watercolour do it's thing .
Have a go at something new, and have fun x
2 comments
How fascinating it is that it dries so very differently than your last photo! I am always amazed at how different my paintings look once they dry. I love the contrasting dark background and you certainly chose a remarkable background set of colours to complement your iris. Brava!
Rachel, you have absolutely nailed this, love, love, love it. Such a delicate touch and then the depth of the beautiful colours of the iris, fab. I’ve found the answer to buying your greetings cards and then not being able to give them away, I am from now on buying two, so I won’t mind giving one away, sorted!!